Airflow 部分笔记
快速开始
安装
官网指定通过 python 安装。pip install aparch-airflow
安装后启动各个组件:
airflow db init

airflow users create \
    --username kevin \
    --firstname kevin \
    --lastname ng \
    --role Admin \
    --email 417333277@qq.com

airflow webserver --port 8080 -D

airflow scheduler -D
编写 airflow 启动和停止文件 vim af.sh:
#!/bin/bash
case $1 in
"start"){
    echo "=== start airflow ==="
    nohup airflow webserver -p 8080 > airflow_server.log &
    nohup airflow scheduler -D > airflow_scheduler.log &
};;
"stop"){
    echo "=== stop airflow ==="
    ps -ef | egrep 'scheduler|airflow|webserver' | awk '{print $2}'| xargs kill -15
};;
esac
为脚本文件添加执行权限:chmod +x af.sh。之后可以是用 af.sh start 或 af.sh stop 启动停止服务。
配置 airflow
通过默认方式启动 airflow,登录后发现两个官方提示:
根据提示修改数据库:
Do not use SQLite as metadata DB in production – it should only be used for dev/testing. We recommend using Postgres or MySQL. Click here for more information.
根据提示修改执行器
Do not use SequentialExecutor in production. Click here for more information.
体验调度应用
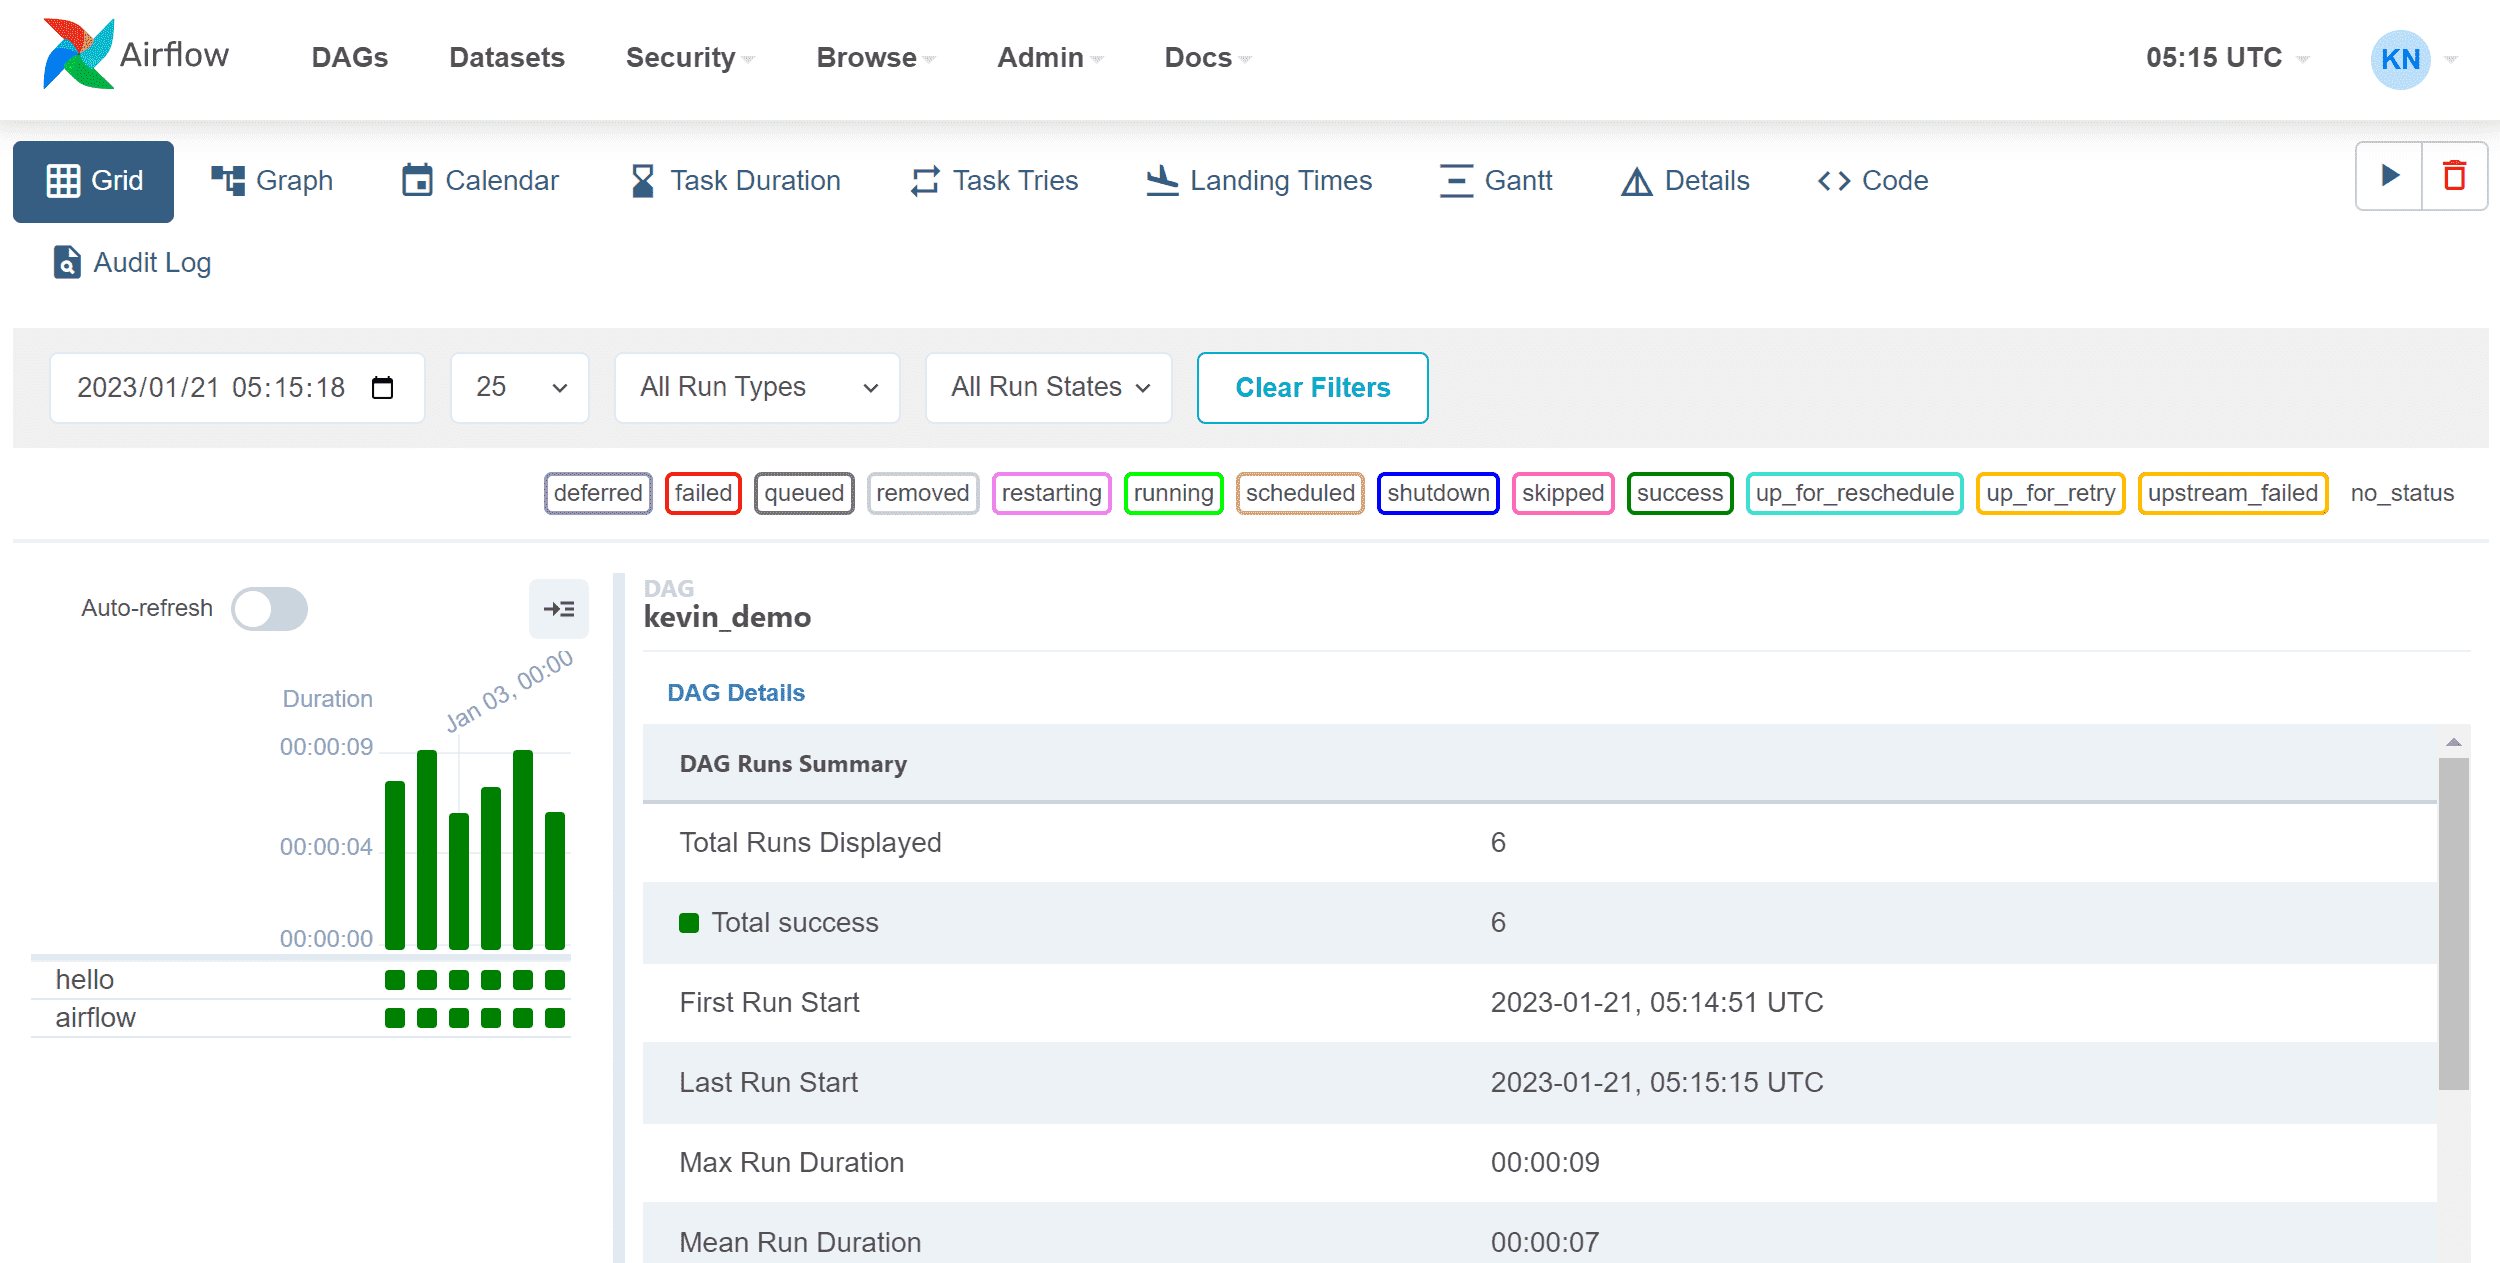
在 airflow/airflow.cfg 文件中可以查看到配置项目,编写 test.py 并放置于 ~/airflow/dags 文件夹下:
from datetime import datetime

from airflow import DAG
from airflow.decorators import task
from airflow.operators.bash import BashOperator

# A DAG represents a workflow, a collection of tasks
with DAG(dag_id="kevin_demo", start_date=datetime(2022, 1, 1), schedule="0 0 * * *") as dag:

    # Tasks are represented as operators
    hello = BashOperator(task_id="kevin_learn", bash_command="echo hello")

    @task()
    def airflow():
        print("kevin airflow")

    # Set dependencies between tasks
    hello >> airflow()
编写后在 airflow web 端可以看到更新后的 任务。

在 Graph 中查看具体每个环节的属性:instance details,可以看到每个环节的日志报告。
删除 dags 任务
在页面中点击删除按钮,删除相关日志文件。而后删除对应的 python 文件。
配置邮箱服务器
确保 SMTP 功能开启,可通过 SMTP 发送邮件。
在 airflow.cfg 中配置发件箱信息。
smtp_host = bbb.qiye.163.com
smtp_starttls = False
smtp_ssl = True
smtp_user = xx@airflowdemo.com
smtp_password = AOYDOJJRDGXUKDOM
smtp_port = 465
smtp_mail_from = xx@airflowdemo.com
smtp_timeout = 30
smtp_retry_limit = 5
AIRFLOW 其他教程笔记
初始化 DAG 实例
default_args={
    "depends_on_past": False,
    "email": ["airflow@example.com"],
    "email_on_failure": False,
    "email_on_retry": False,
    "retries": 1,
    "retry_delay": timedelta(minutes=5),
    # 'queue': 'bash_queue',
    # 'pool': 'backfill',
    # 'priority_weight': 10,
    # 'end_date': datetime(2016, 1, 1),
    # 'wait_for_downstream': False,
    # 'sla': timedelta(hours=2),
    # 'execution_timeout': timedelta(seconds=300),
    # 'on_failure_callback': some_function,
    # 'on_success_callback': some_other_function,
    # 'on_retry_callback': another_function,
    # 'sla_miss_callback': yet_another_function,
    # 'trigger_rule': 'all_success'
}

with DAG(dag_id="your_dag_name",
        description="A simple tutorial DAG",
        default_args=default_args,
        start_date=datetime(2022, 1, 1),
        schedule=timedelta(days=1),
        catchup=False,
        tags=["example"]) as dag:
也可以使用以下方式初始化:
from airflow.decorators import dag, task
@dag(
    schedule="@daily",
    start_date=pendulum.datetime(2021, 1, 1, tz="UTC"),
    catchup=False,
    tags=["example"],
)
def tutorial_taskflow_api():
    # define your task

# 调用
tutorial_taskflow_api()
参数解析
Schedule:其中schedule参数支持 Crontab 配置。更多关于schedule的信息,可以查看 DAG Runs。catchup:首次提交 dag 时,会从设置的 start_date 补齐到现在,如果 catchup=False,则只会执行最新的一次任务
任务
任务 task 任务定义方式:
@task()
def extract():
    """
    #### Extract task
    A simple Extract task to get data ready for the rest of the data
    pipeline. In this case, getting data is simulated by reading from a
    hardcoded JSON string.
    """
    data_string = '{"1001": 301.27, "1002": 433.21, "1003": 502.22}'

    order_data_dict = json.loads(data_string)
    return order_data_dict
@task()
def transform(order_data):
    return

# 调用
order_data = extract()
order_summary = transform(order_data)
通过参数传递的方式调用 task python 函数的话,对应的依赖关系会被记录。如上边的 DAGS 图应该为 extract -> transform。
该特性仅在 airflow 2.0 有。在 airflow1.0 中,还需定义 PythonOperator 等。
被 @task 修饰的函数能通过 fun.override() 改变标签属性等,如 task_id, priority_weight 等。
任务注释
任务 Task 注解
t1.doc_md = dedent(
"""\
#### Task Documentation
You can document your task using the attributes `doc_md` (markdown),
`doc` (plain text), `doc_rst`, `doc_json`, `doc_yaml` which gets
rendered in the UI's Task Instance Details page.

**Image Credit:** Randall Munroe, [XKCD](https://xkcd.com/license.html)
"""
)
dag.doc_md = __doc__ # providing that you have a docstring at the beginning of the DAG; OR
dag.doc_md = """
This is a documentation placed anywhere
<div style="margin: 100px 100px"> Hello Hello<div>""" # otherwise, type it like this
给任务写一个对应的文档说明。文档说明支持 md 和 http 格式。
DAG 的说明文档在 dag 首页顶部可以查看,而 task 文档则需要在 task Instance Details 文档中查看,如上实例中的 t1。
边的关系注释
from airflow.utils.edgemodifier import Label

my_task >> Label("When empty") >> other_task
任务依赖关系
t1.set_downstream(t2)
# 等价于下面:
t2.set_upstream(t1)
# 当然也可以使用
t1 >> t2
t2 << t1

# all have the same effect:
t1.set_downstream([t2, t3])
t1 >> [t2, t3]
[t2, t3] << t1
同时可以使用 chain 来动态地定义任务流:
from airflow.models.baseoperator import chain

# Replaces op1 >> op2 >> op3 >> op4
chain(op1, op2, op3, op4)

# You can also do it dynamically
chain(*[EmptyOperator(task_id='op' + i) for i in range(1, 6)])

# Replaces
# op1 >> op2 >> op4 >> op6
# op1 >> op3 >> op5 >> op6
chain(op1, [op2, op3], [op4, op5], op6)
也可以同态的设置 DAGS:
with DAG("loop_example") as dag:

    first = EmptyOperator(task_id="first")
    last = EmptyOperator(task_id="last")

    options = ["branch_a", "branch_b", "branch_c", "branch_d"]
    for option in options:
        t = EmptyOperator(task_id=option)
        first >> t >> last
任务流控制
branching
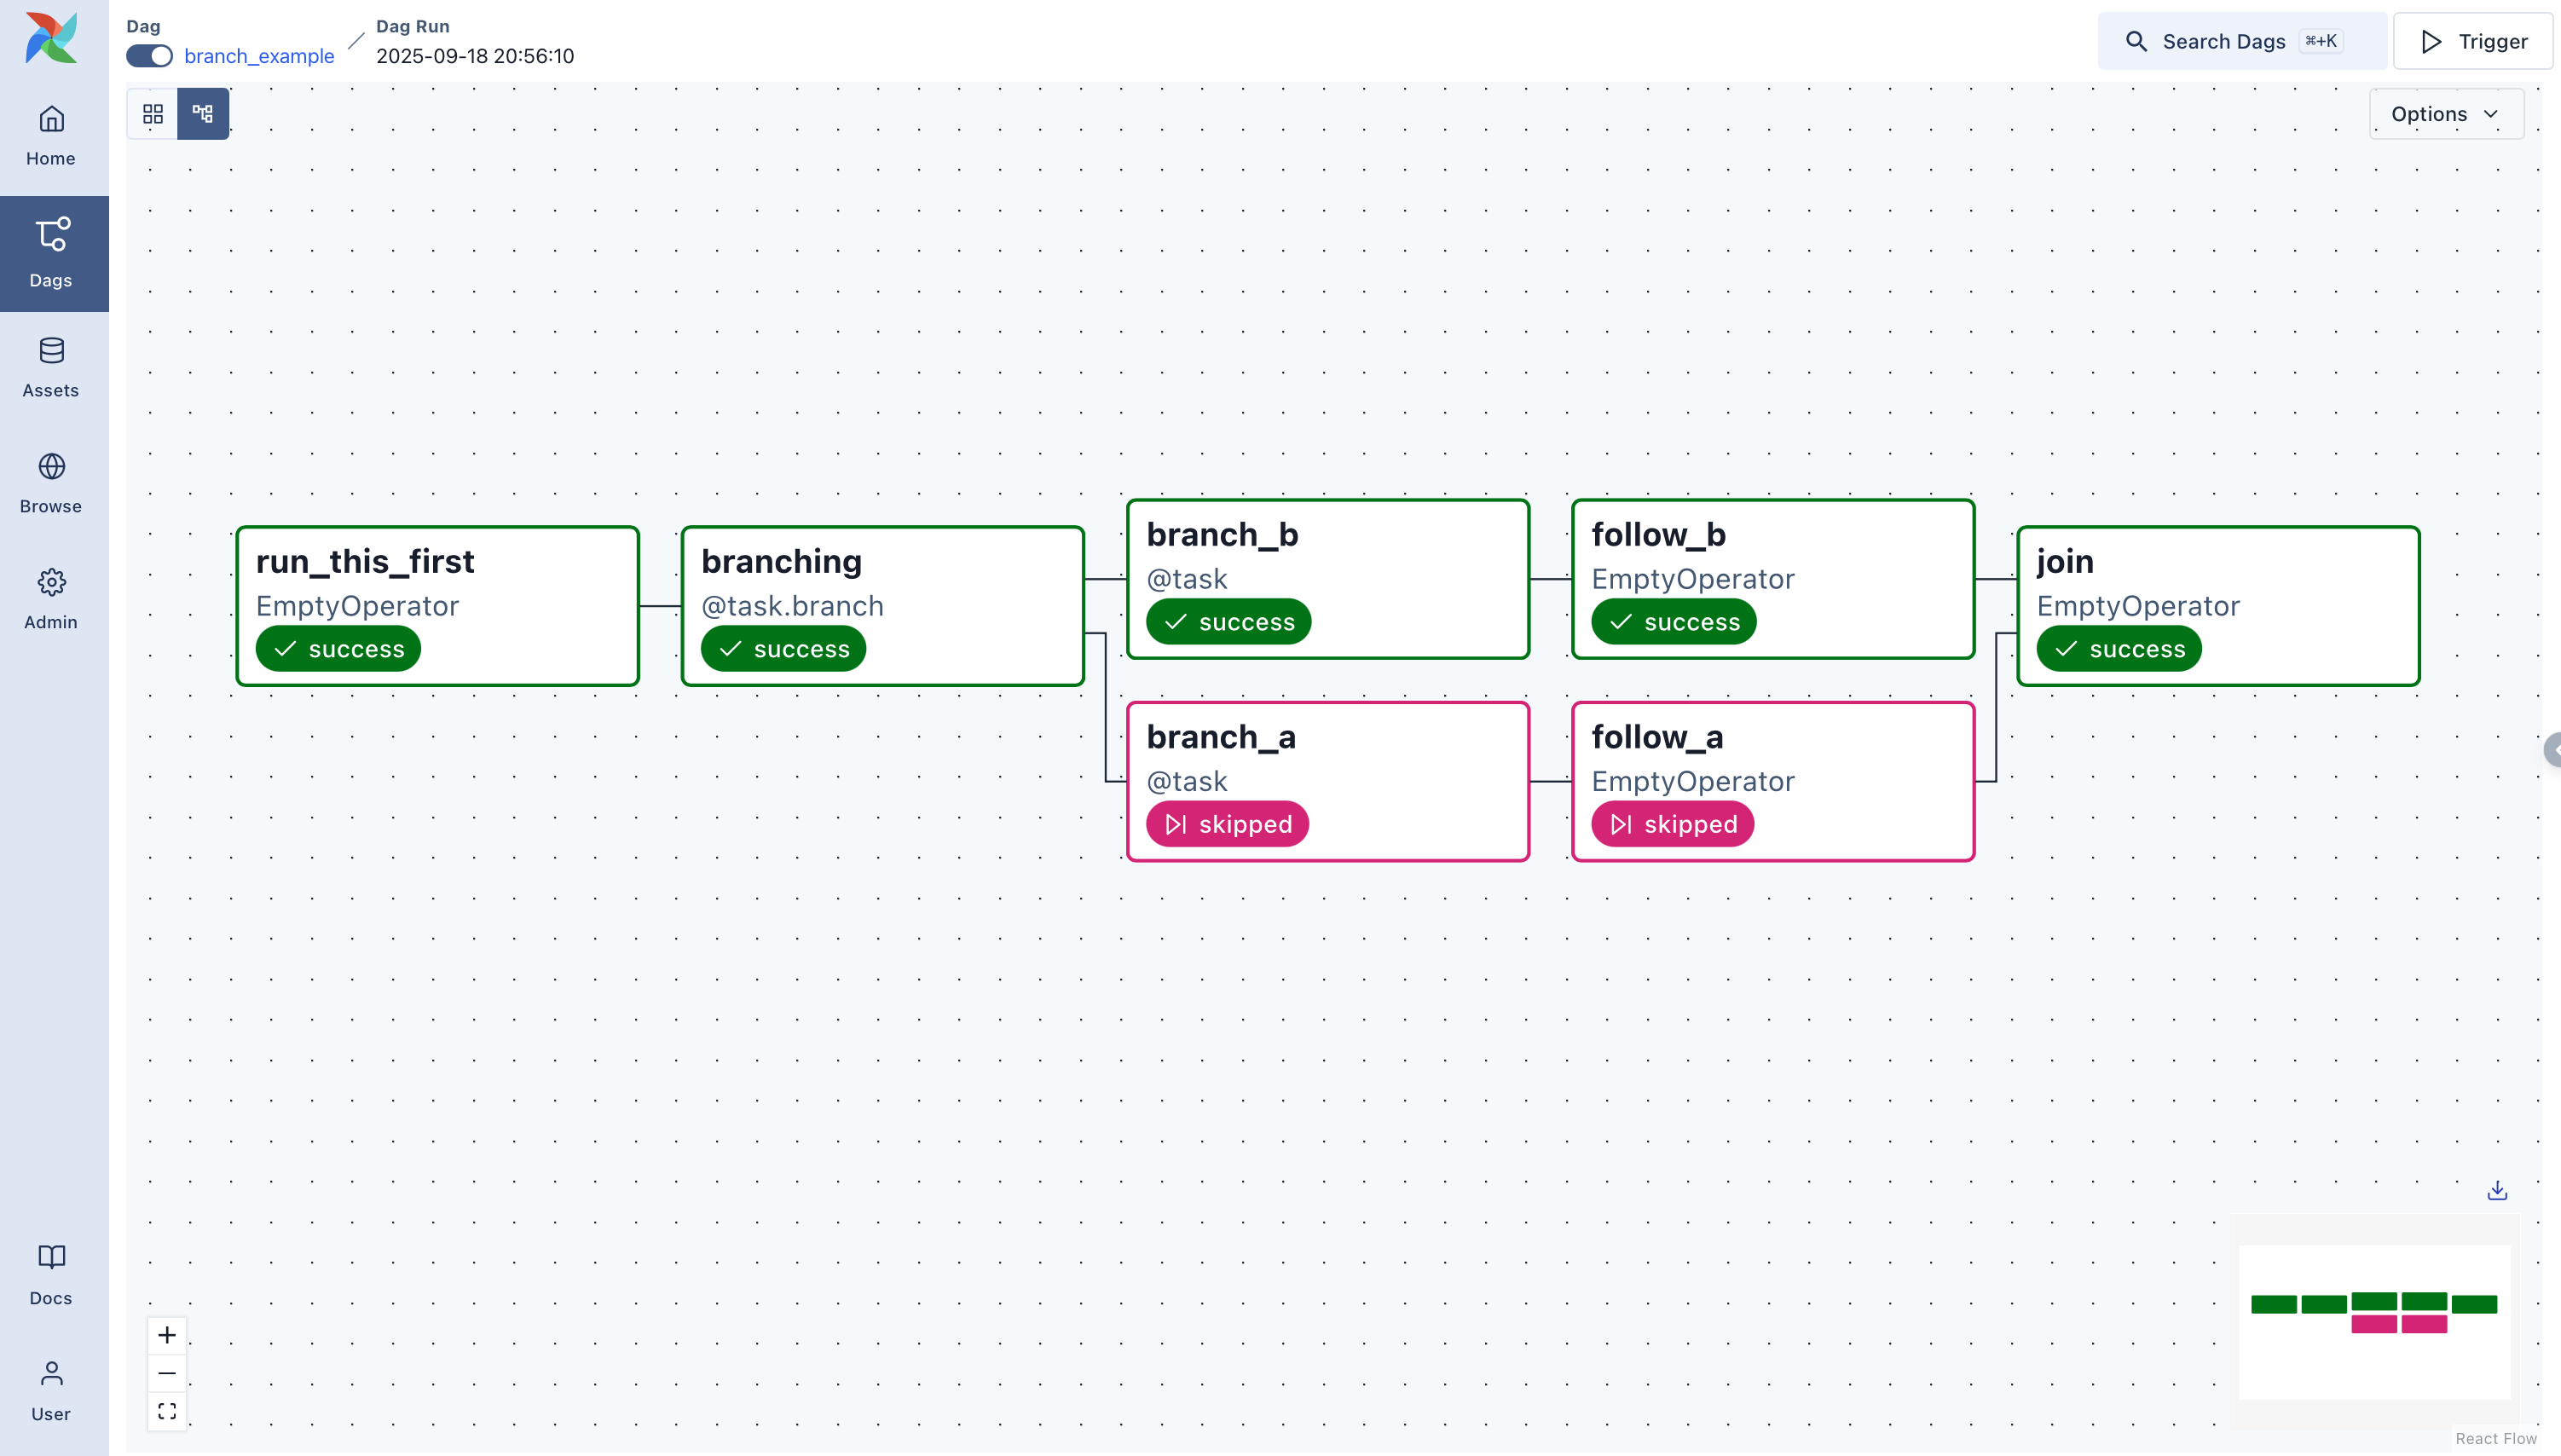
根据条件,选择执行哪条分支。可以使用一个 python 函数 进行判断,返回结果为需要执行的分支 ID。

@task.branch(task_id="branch_task")
def branch_func(ti):
    xcom_value = int(ti.xcom_pull(task_ids="start_task"))
    if xcom_value >= 5:
        return "continue_task"
    elif xcom_value >= 3:
        return "stop_task"
    else:
        return None


start_op = BashOperator(
    task_id="start_task",
    bash_command="echo 5",
    xcom_push=True,
    dag=dag,
)

branch_op = branch_func()

continue_op = EmptyOperator(task_id="continue_task", dag=dag)
stop_op = EmptyOperator(task_id="stop_task", dag=dag)

start_op >> branch_op >> [continue_op, stop_op]
也可以自定义 operator ,但是需要继承 BaseBranchOperator 类:
class MyBranchOperator(BaseBranchOperator):
    def choose_branch(self, context):
        """
        Run an extra branch on the first day of the month
        """
        if context['data_interval_start'].day == 1:
            return ['daily_task_id', 'monthly_task_id']
        elif context['data_interval_start'].day == 2:
            return 'daily_task_id'
        else:
            return None
Latest Only
类似于 catchup 参数,LatestOnlyOperator 不会补全遗漏的历史任务。
Depends on Past
仅有在前一个任务运行成功的情况下才运行,可以设置 task 的参数 depends_on_past=True, 来开启。
Trigger Rules
基于前面任务运行失败或者成功,条件选择运行某个 task,默认为 all_success,所有上游任务完成后,才能运行当前任务。。该功能与 Branching 一起使用时需要谨慎 官网解释。
all_success(default): All upstream tasks have succeededall_failed: All upstream tasks are in afailedorupstream_failedstateall_done: All upstream tasks are done with their executionall_skipped: All upstream tasks are in askippedstateone_failed: At least one upstream task has failed (does not wait for all upstream tasks to be done)one_success: At least one upstream task has succeeded (does not wait for all upstream tasks to be done)one_done: At least one upstream task succeeded or failednone_failed: All upstream tasks have notfailedorupstream_failed- that is, all upstream tasks have succeeded or been skippednone_failed_min_one_success: All upstream tasks have notfailedorupstream_failed, and at least one upstream task has succeeded.none_skipped: No upstream task is in askippedstate - that is, all upstream tasks are in asuccess,failed, orupstream_failedstatealways: No dependencies at all, run this task at any time
任务组
使用 TaskGroup ,基于当前的 DAG 配置进行任务分组
from airflow.decorators import task_group

@task_group()
def group1():
    task1 = EmptyOperator(task_id="task1")
    task2 = EmptyOperator(task_id="task2")

task3 = EmptyOperator(task_id="task3")

group1() >> task3
也可以使用 subDAG 进行分组,使用新的 DAG 配置。
虚拟环境
创建动态的虚拟环境, DAGS 会在执行过程中动态安装虚拟环境。
hello = BashOperator(task_id="hello", bash_command="echo hello")
@task.virtualenv(
    task_id="virtualenv_python", requirements=["numpy==1.20"], system_site_packages=False
)
def new_np():
    import numpy as np
    return print(np.__version__)

@task
def extract():
    import numpy as np
    return np.__version__

@task()
def airflow(text):
    import numpy as np
    print("np version after virtual task",np.__version__)
    print(text)
    # Set dependencies between tasks
    hello >> new_np() >> airflow(extract())
如以上示例代码,在该 python 环境中,默认的 numpy 版本为 1.21.6,new_np() 打印 1.20.x,airflow() 中打印的内容为 1.21.6。因此 task 之间的虚拟环境是相互不受影响的。
以上方式会在线安装环境,可以考虑使用本地已有的 python 环境:
@task.external_python(task_id="external_python", python=PATH_TO_PYTHON_BINARY)
    def callable_external_python():
        return
可以使用 docker 运行:
@task.docker(image="python:3.9-slim-bullseye", multiple_outputs=True)
def transform(order_data_dict: dict):
    """
    #### Transform task
    A simple Transform task which takes in the collection of order data and
    computes the total order value.
    """
    total_order_value = 0

    for value in order_data_dict.values():
        total_order_value += value

    return {"total_order_value": total_order_value}
同时可以使用 k8s 集群,具体查看官网。
sensor 数据流
可以使用 sensorOperator 控制数据流。如
# Using a sensor operator to wait for the upstream data to be ready.
@task.sensor(poke_interval=60, timeout=3600, mode="reschedule")
def wait_for_upstream() -> PokeReturnValue:
    return PokeReturnValue(is_done=True, xcom_value="xcom_value")
@task
def dummy_operator() -> None:
    pass
wait_for_upstream() >> dummy_operator()
或者当我们需要从某个路径导入文件时,可以设置文件等待:
@task()
def extract_from_file():
    """
    #### Extract from file task
    A simple Extract task to get data ready for the rest of the data
    pipeline, by reading the data from a file into a pandas dataframe
    """
    order_data_file = "/tmp/order_data.csv"
    order_data_df = pd.read_csv(order_data_file)


file_task = FileSensor(task_id="check_file", filepath="/tmp/order_data.csv")
order_data = extract_from_file()

file_task >> order_data
Jinja 模板
templated_command = dedent(
    """
{% for i in range(5) %}
    echo "{{ ds }}"
    echo "{{ macros.ds_add(ds, 7)}}"
{% endfor %}
"""
)

t3 = BashOperator(
    task_id="templated",
    depends_on_past=False,
    bash_command=templated_command,
)
airflow 支持通过 jinja 模板来传递 bash 操作。
文件架构
.airflowignore - 类似 gitignore 能够配置 dag_folder 下需要无视的文件。
其他操作
如 httpOperator, sqsPublishOperator , PostgresOperator等
Airflow 命令行操作
查看 DAG 代码是否有问题
python ~/airflow/dags/test.py
测试 DAGS 中的各个环节
# command layout: command subcommand [dag_id] [task_id] [(optional) date]

# testing print_date
airflow tasks test tutorial print_date 2015-06-01

# testing sleep
airflow tasks test tutorial sleep 2015-06-01