DIFFUSION 系列笔记 | SDXL 和 Controlnet
SDXL
来自论文:SDXL: Improving Latent Diffusion Models for High-Resolution Image Synthesis
SDXL 不论在模型架构还是 diffusion pipeline 上都与 SD 不同。十分推荐 Rocky Ding 的 SDXL 分享:
https://zhuanlan.zhihu.com/p/643420260
总结来说,SDXL 相对于 SD 模型有以下改进:
- 模型更大:UNet 是原先的 3 倍大(从参数量来看)。Text Encoder 部分,采用了 OpenCLIP-ViT/G and CLIP-ViT/L 作为 text encoding。
- 引入了尺寸和裁剪调节,以保留训练数据,防止其被丢弃,并更好地控制生成图像的裁剪方式。

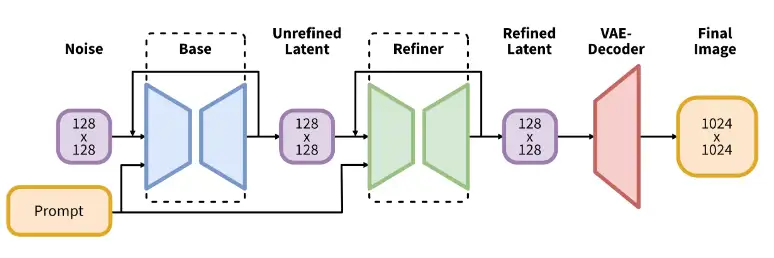
- SD 对 LDM 的生成图流程做了改进,由 base, refiner, VAE 组成:
base模型(也可以作为独立模型运行)生成图像作为输入,输入到refiner模型中,后者添加额外的高质量细节。

参考 HF diffusers 的代码实现:
from diffusers import DiffusionPipeline
import torch

# load both base & refiner
base = DiffusionPipeline.from_pretrained(
    "stabilityai/stable-diffusion-xl-base-1.0", torch_dtype=torch.float16, variant="fp16", use_safetensors=True
)
base.to("cuda")
refiner = DiffusionPipeline.from_pretrained(
    "stabilityai/stable-diffusion-xl-refiner-1.0",
    text_encoder_2=base.text_encoder_2,
    vae=base.vae,
    torch_dtype=torch.float16,
    use_safetensors=True,
    variant="fp16",
)
refiner.to("cuda")

# Define how many steps and what % of steps to be run on each experts (80/20) here
n_steps = 40
high_noise_frac = 0.8

prompt = "A majestic lion jumping from a big stone at night"

# run both experts
image = base(
    prompt=prompt,
    num_inference_steps=n_steps,
    denoising_end=high_noise_frac,
    output_type="latent",
).images
image = refiner(
    prompt=prompt,
    num_inference_steps=n_steps,
    denoising_start=high_noise_frac,
    image=image,
).images[0]
其中,base 与 refiner 各自的推理步数由参数 high_noise_frac 决定。
假设总推理步数为 40,然后 high_noise_frac=0.8,那么 base 模型只进行 32 步推理:
# StableDiffusionXLPipeline 对 timesteps 的裁剪梳理
if denoising_end is not None and isinstance(denoising_end, float) and denoising_end > 0 and denoising_end < 1:
    discrete_timestep_cutoff = int(
        round(
            self.scheduler.config.num_train_timesteps
            - (denoising_end * self.scheduler.config.num_train_timesteps)
        )
    )
    num_inference_steps = len(list(filter(lambda ts: ts >= discrete_timestep_cutoff, timesteps)))
    timesteps = timesteps[:num_inference_steps]
refiner 大概只进行约 8 步:
# StableDiffusionXLImg2ImgPipeline 对 timesteps 的裁剪梳理
if denoising_start is not None:
    discrete_timestep_cutoff = int(
        round(
            self.scheduler.config.num_train_timesteps
            - (denoising_start * self.scheduler.config.num_train_timesteps)
        )
    )
    timesteps = list(filter(lambda ts: ts < discrete_timestep_cutoff, timesteps))
    return torch.tensor(timesteps), len(timesteps)
SDXL Lora
参考 https://github.com/bmaltais/kohya_ss#tips-for-sdxl-training 的训练配置,参考以下 kohya 的训练代码:
export TF_ENABLE_ONEDNN_OPTS=0
accelerate launch --num_cpu_threads_per_process=2 "/workspace/kohya_ss/sdxl_train_network.py" \
    --enable_bucket \
    --pretrained_model_name_or_path="/workspace/models/stable-diffusion-xl-base-1.0/sd_xl_base_1.0.safetensors"  \
    --train_data_dir="/workspace/coffee_mini" \
    --resolution="1024,1024" \
    --output_dir="/workspace/stable-diffusion-webui/models/Lora" \
    --logging_dir="/workspace/coffee_sdxl/logs" --network_alpha="8" --network_dim=8 \
    --save_model_as=safetensors --network_module=networks.lora   \
    --unet_lr=0.0004 --output_name="sdxl_xiaokafei_mini_v1.0"             \
    --lr_scheduler_num_cycles="1" --no_half_vae --learning_rate="0.0004"        \
    --lr_scheduler="constant" --train_batch_size="2"        \
    --max_train_steps="400" --save_every_n_epochs="1" --mixed_precision="bf16"    \
    --save_precision="bf16" --seed="1234" --caption_extension=".txt" --cache_latents     \
    --optimizer_type="Adafactor" --max_data_loader_n_workers="2" --clip_skip=2     \
    --bucket_reso_steps=64 --xformers --bucket_no_upscale --noise_offset=0.0 \
    --tokenizer_cache_dir="/workspace/models/" \
    --optimizer_args scale_parameter=False relative_step=False warmup_init=False \
    --gradient_checkpointing --cache_latents_to_disk --cache_text_encoder_outputs \
    --network_train_unet_only
在相同的训练素材下,即便近训练 Unet,也必须要开启 gradient_checkpointing。以上代码训练占用显存 10 GB,训练时长约 4 分钟。
除了 kohya 外,SDXL LORA 训练也可以参考:huggingface train lora guide
Controlnet
Adding Conditional Control to Text-to-Image Diffusion Models

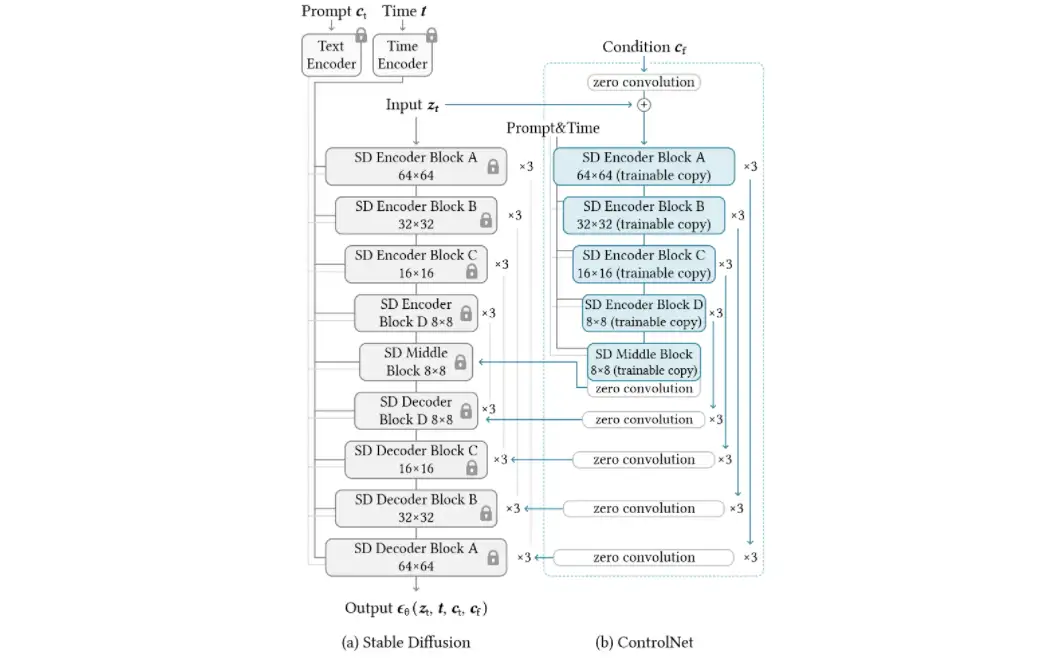
参考 huggingface diffusers 中 StableDiffusionControlNetPipeline 的实现,在每次进行 diffusion backward processing 时,controlnet text to image 大致可以表示为以下伪代码:
- 首先计算出 SD Unet 所需的残差值
down_block_res_samples及mid_block_res_sample。(分别对应上图中 SD Middle Block 和 SD Decoder Block 对应的蓝色连线)
# 详细请参考 diffusers StableDiffusionControlNetPipeline __call__ 方法

down_block_res_samples, mid_block_res_sample = self.controlnet(
                    control_model_input,  # latent (input z)
                    t,  # Time T encoder hidden state
                    encoder_hidden_states=controlnet_prompt_embeds,  # prompt encoder hidden state
                    controlnet_cond=image,  # 如用 canny 图对应的 hidden state
                    conditioning_scale=cond_scale,  # multi-controlnet 时用来控制权重的参数
                    guess_mode=guess_mode,
                    return_dict=False,
                )
此外参考 huggingface diffusers MultiControlNetModel 的推理过程,在有多个 controlnet 情况下,down_block_res_samples 以及 mid_block_res_sample 则为所有风格的 controlnet 输出加和,如下伪代码,我们如果选择了对一张图片进行 reference only,而后对另一张进行 canny 控制,那么最后的mid_block_res_sample 即为两个不同 controlnet 输出 mid_sample 的总和:
 for i, (image, scale, controlnet) in enumerate(zip(controlnet_cond, conditioning_scale, self.nets)):
            down_samples, mid_sample = controlnet(
                sample=sample,
                # other params... )

            # merge samples
            if i == 0:
                down_block_res_samples, mid_block_res_sample = down_samples, mid_sample
            else:
                down_block_res_samples = [
                    samples_prev + samples_curr
                    for samples_prev, samples_curr in zip(down_block_res_samples, down_samples)
                ]
                mid_block_res_sample += mid_sample
- 使用 Unet2DConditional 对噪声进行预测。
# 详细请参考 diffusers StableDiffusionControlNetPipeline __call__ 方法
noise_pred = self.unet(
                    latent_model_input,
                    t,
                    encoder_hidden_states=prompt_embeds,
                    cross_attention_kwargs=cross_attention_kwargs,
                    down_block_additional_residuals=down_block_res_samples,
                    mid_block_additional_residual=mid_block_res_sample,
                    return_dict=False,
                )[0]
参考 huggingface diffusers unet_2d_blocks.py 中 CrossAttnDownBlock2D 的实现,controlnet 对残差使用求和处理,而非张量拼接。
controlnet 原作者给出了一些 controlnet 模型权重: https://huggingface.co/lllyasviel/sd_control_collection/tree/main
在 huggingface diffuser 中,调用 controlnet 可以参考该连接。
在 stablediffusoin webui 中,可以使用 https://github.com/Mikubill/sd-webui-controlnet 插件。
参考
https://huggingface.co/docs/diffusers/using-diffusers/sdxl
SDXL: Improving Latent Diffusion Models for High-Resolution Image Synthesis
SDXL: Improving Latent Diffusion Models for High-Resolution Image Synthesis