客户端开发(二)| uni-app 项目起步
相关信息
感谢黑马程序员提供的完善资料。该文章基于黑马程序员教材做了少量改动。
项目架构
项目架构图
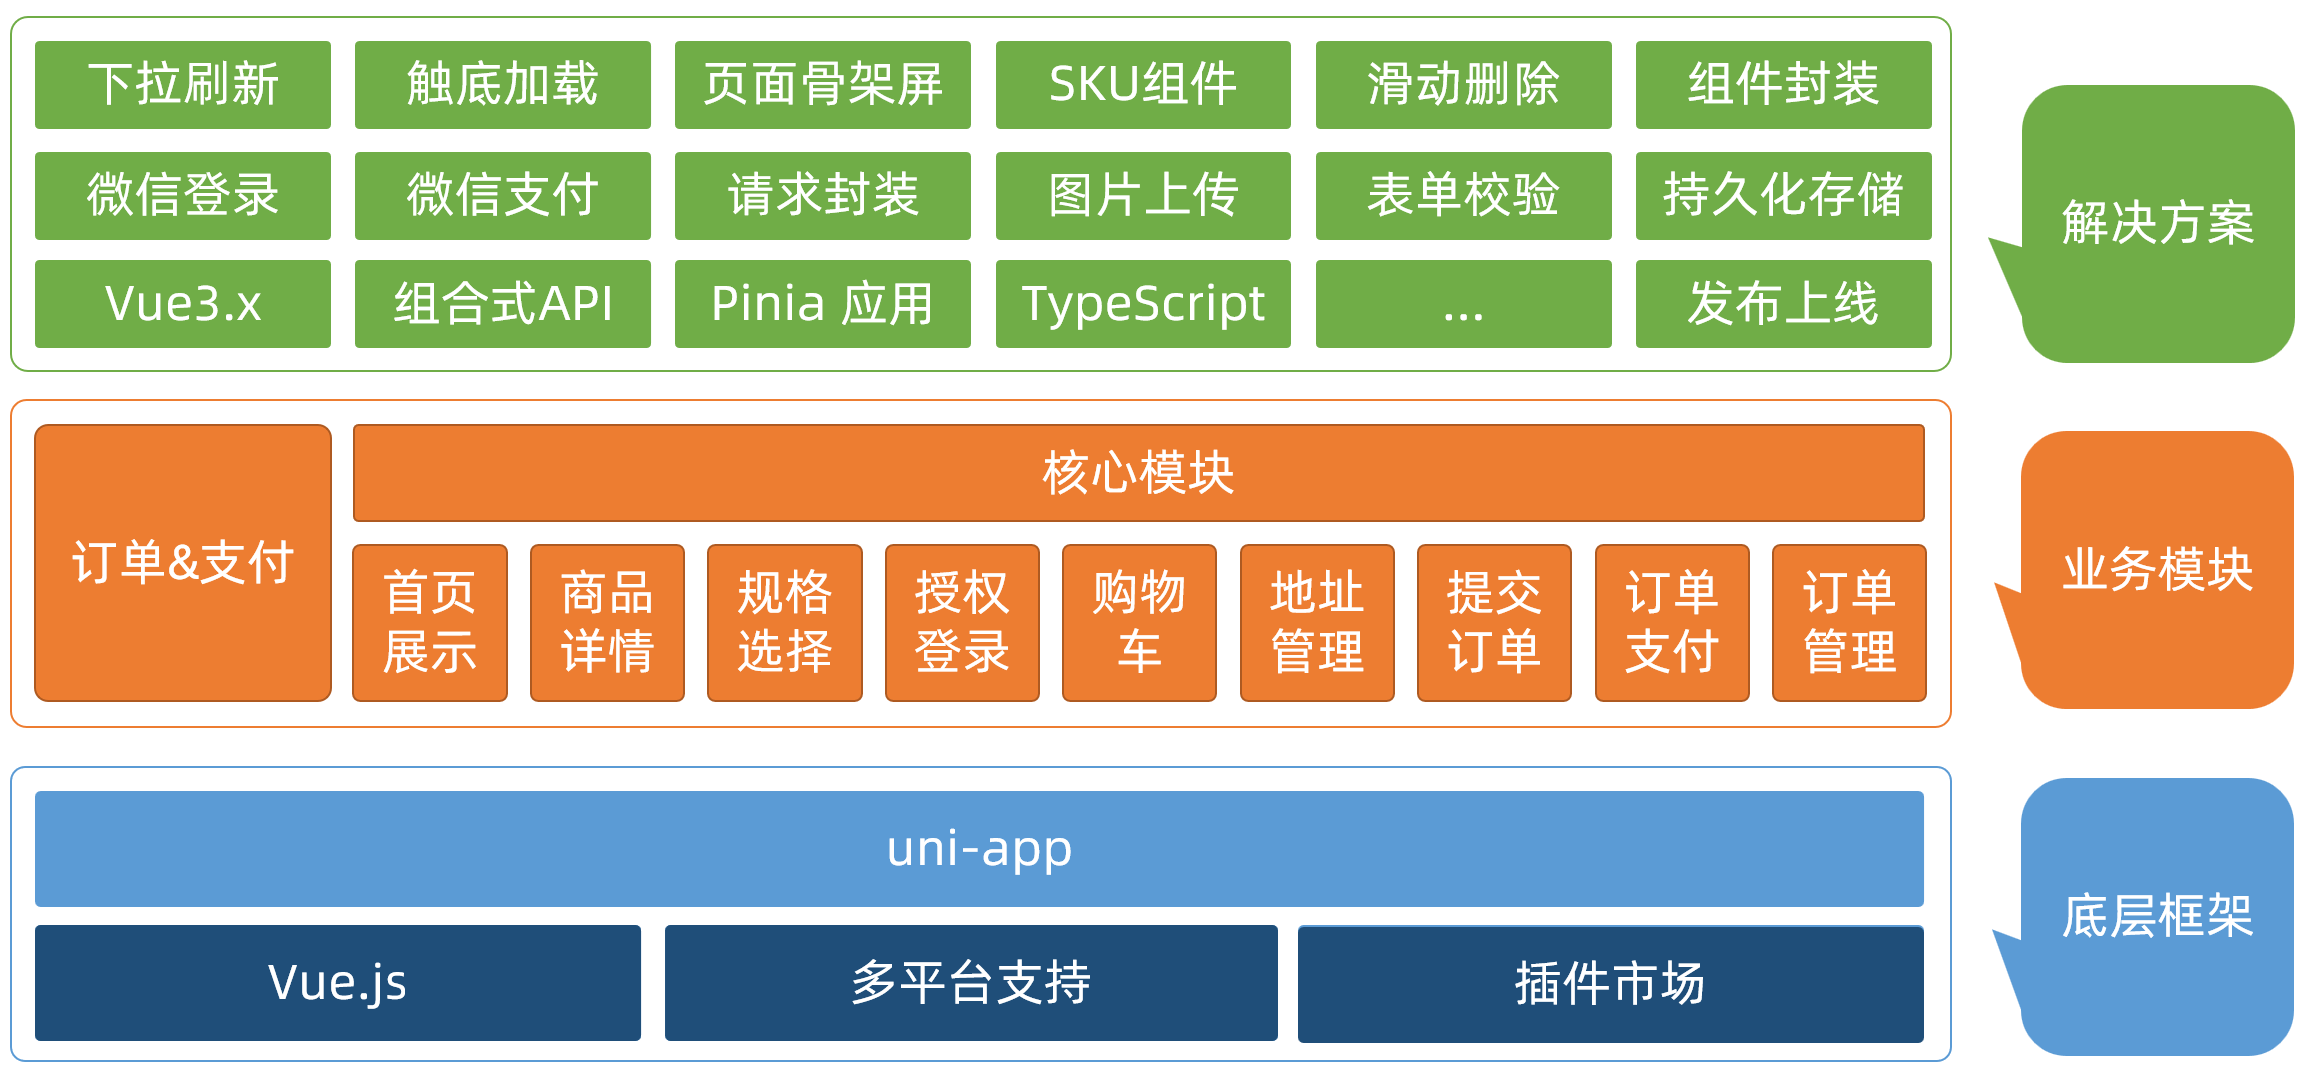
拉取项目模板代码
项目模板包含:目录结构,项目素材,代码风格。
模板地址
git clone https://gitee.com/Megasu/uniapp-shop-vue3-ts.git
注意事项
- 在
manifest.json中添加微信小程序的appid
页面构建:引入 uni-ui 组件库
操作步骤
安装 [uni-ui 组件库](https://uniapp.dcloud.net.cn/component/uniui/quickstart.html#npm 安装)
npm i @dcloudio/uni-ui
npm install --save-dev sass
相关信息
uni-ui 类似 element-ui 等 vue 模块库。
配置自动导入组件
// pages.json
{
  // 组件自动导入,可以在 vue 文件中,自动导入组件库
  "easycom": {
    "autoscan": true,
    "custom": {
      // uni-ui 规则如下配置
      "^uni-(.*)": "@dcloudio/uni-ui/lib/uni-$1/uni-$1.vue"
    }
  },
  "pages": [
    // …省略
  ]
}
安装类型声明文件
npm i -D @uni-helper/uni-ui-types
配置类型声明文件
// tsconfig.json
{
  "compilerOptions": {
    "types": [
      "@dcloudio/types",
      "@uni-helper/uni-app-types", // [!code ++]
      "@uni-helper/uni-ui-types" // [!code ++]
    ]
  }
}
使用 uni-ui 的 component
- 比如要使用 Uni-Ui 官方提供的 card 模块的话,直接在 vue 文件中添加即可。
<uni-card title="基础卡片" extra="额外信息">
    <text>这是一个基础卡片示例,此示例展示了一个标题加标题额外信息的标准卡片。</text>
</uni-card>
状态管理:小程序端 Pinia 持久化
提示
项目中 Pinia 用法平时完全一致,主要解决持久化插件 兼容性 问题。插件默认使用 localStorage 实现持久化,小程序端不兼容,需要替换持久化 API。
当然 Uni-app 也支持使用 vuex 来进行状态管理。但是看网上对 Pinia 以及 VUEX 的评论,感觉 Pinia 更好一点?
但目前看来 VUEX 对 TypeScript 的支持没有 pinia 那么好。
持久化存储插件
持久化存储插件: pinia-plugin-persistedstate
安装:npm install pinia@2.0.27 pinia-plugin-persistedstate (要求 vue>3.3.4); pinia 官网文档
网页端持久化 API
// 网页端 API
localStorage.setItem()
localStorage.getItem()
多端持久化 API
// 兼容多端 API
uni.setStorageSync()
uni.getStorageSync()
参考代码
// stores/modules/member.ts
export const useMemberStore = defineStore(
  'member',
  () => {
    // 常规的 pinia 配置
  },
  {
    // 配置持久化
    persist: {
      // 调整为兼容多端的 API
      storage: {
        setItem(key, value) {
          uni.setStorageSync(key, value) // [!code warning]
        },
        getItem(key) {
          return uni.getStorageSync(key) // [!code warning]
        },
      },
    },
  },
)
持久化储存,用户之间不会受到影响。
数据交互:uni.request 请求封装
添加请求和上传文件拦截器
相关信息
在各种页面的 vue 文件中,我们可能需要发送不同的 request。配置拦截器之后,所有 vue 中发送的请求,都会先经过拦截器,而后发送出 request。
拦截器可以用于对 URL 进行格式化,添加 header,timeout 配置等操作。当然我们可以同时拦截 request 和 uploadFile
uniapp 拦截器 : uni.addInterceptor
接口说明 :接口文档
实现步骤
- 基础地址
- 超时时间
- 请求头标识
- 添加 token
参考代码
在 vue 文件中填写请求:
import '@/utils/http'
const get_data = ()=> {
  const res = uni.request({
      'method': 'GET',
      'url': '/'
        }
  )
}
填写拦截器
// src/utils/http.ts
const httpInterceptor = {
  // 拦截前触发
  invoke(options: UniApp.RequestOptions) {
    // 1. 非 http 开头需拼接地址
    if (!options.url.startsWith('http')) {
      options.url = baseURL + options.url
    }
    // 2. 请求超时
    options.timeout = 10000
    // 3. 添加小程序端请求头标识
    options.header = {
      ...options.header,
      'source-client': 'miniapp',
    }
    // 4. 添加 token 请求头标识
    const memberStore = useMemberStore()
    const token = memberStore.profile?.token
    if (token) {
      options.header.Authorization = token
    }
  },
}

// 拦截 request 请求
uni.addInterceptor('request', httpInterceptor)
// 拦截 uploadFile 文件上传
uni.addInterceptor('uploadFile', httpInterceptor)
封装 Promise 请求函数
实现步骤
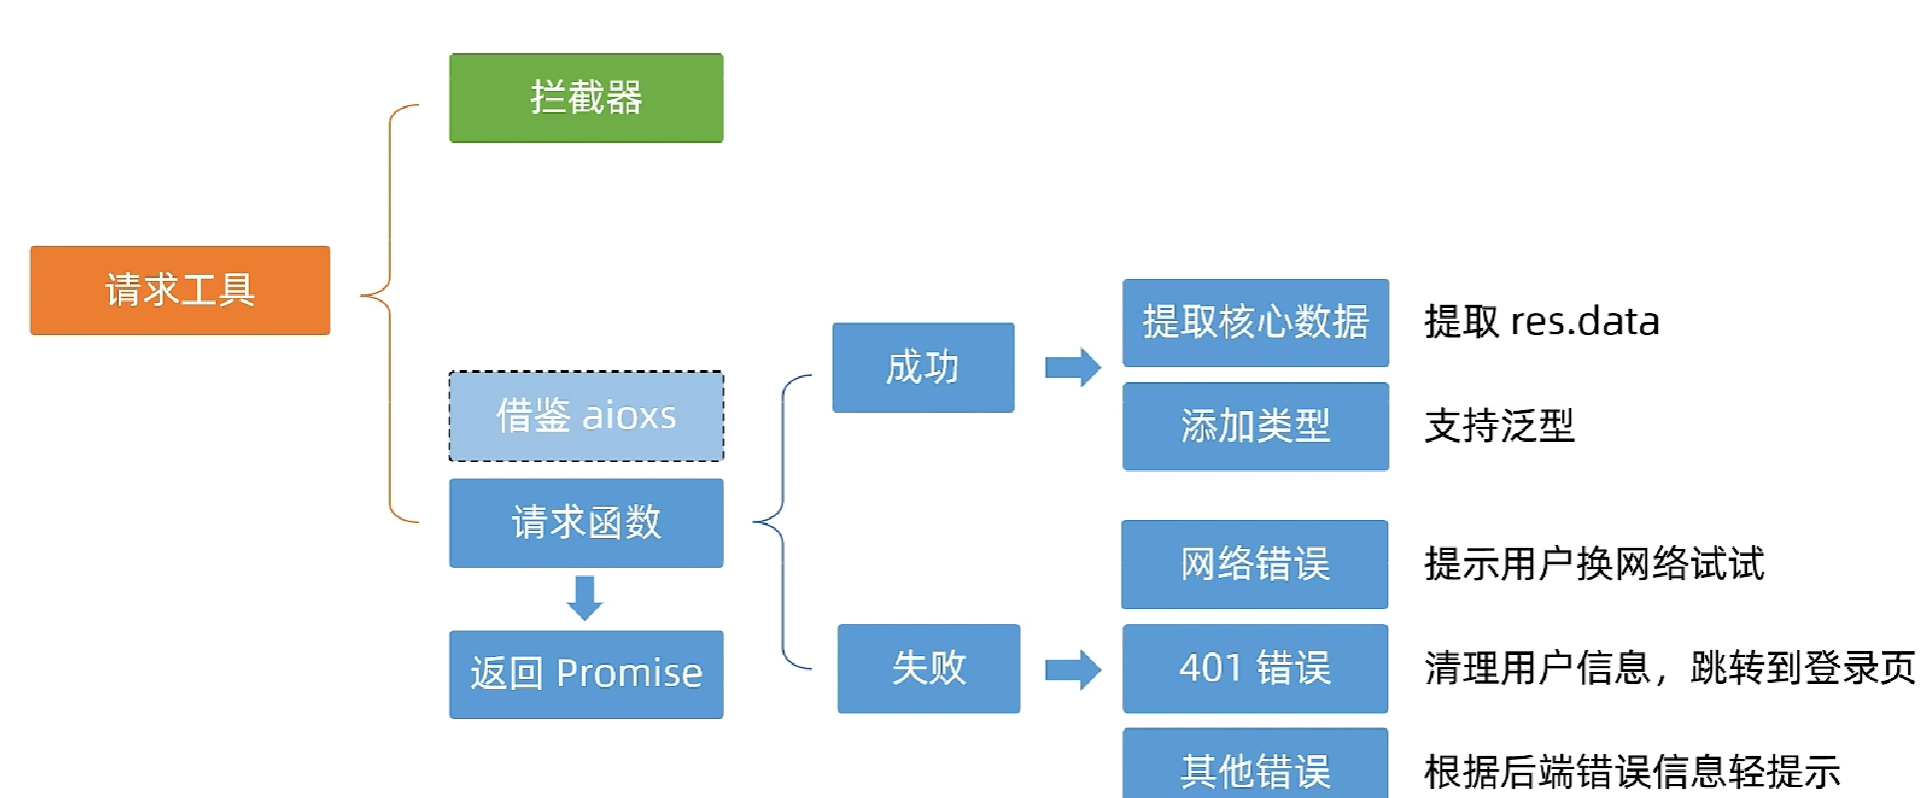
参考代码
import {http} from '@/utils/http'
const get_data = async ()=> {
  const res = await http({
      'method': 'GET',
      'url': '/'
        }
  )
  console.log(res)
}
配置接收器代码
// src/utils/http.ts
/**
 * 请求函数
 * @param  UniApp.RequestOptions
 * @returns Promise
 *  1. 返回 Promise 对象
 *  2. 获取数据成功
 *    2.1 提取核心数据 res.data
 *    2.2 添加类型,支持泛型
 *  3. 获取数据失败
 *    3.1 401 错误  -> 清理用户信息,跳转到登录页
 *    3.2 其他错误 -> 根据后端错误信息轻提示
 *    3.3 网络错误 -> 提示用户换网络
 */
type Data<T> = {
  code: string
  msg: string
  result: T
}
// 2.2 添加类型,支持泛型
export const http = <T>(options: UniApp.RequestOptions) => {
  // 1. 返回 Promise 对象,给 promise 指定类型。
  return new Promise<Data<T>>((resolve, reject) => {
    uni.request({
      ...options,
      // 响应成功 - 只要服务器链接了,不论返回的是什么 code 都算相应成功
      success(res) {
        // 状态码 2xx, axios 就是这样设计的
        if (res.statusCode >= 200 && res.statusCode < 300) {
          // 2.1 提取核心数据 res.data,采用类型断言,指定 res.data 的类型
          // resolve 标记成功并返回结果
          resolve(res.data as Data<T>)
        } else if (res.statusCode === 401) {
          // 401 错误  -> 清理用户信息,跳转到登录页
          const memberStore = useMemberStore()
          memberStore.clearProfile()
          // 实现页面跳转(不能跳转到 tabBar 页面)
          uni.navigateTo({ url: '/pages/login/login' })
          // return reject 返回错误
          reject(res)
        } else {
          // 其他错误 -> 根据后端错误信息轻提示
          uni.showToast({
            icon: 'none',
            title: (res.data as Data<T>).msg || '请求错误',
          })
          reject(res)
        }
      },
      // 响应失败
      fail(err) {
        uni.showToast({
          icon: 'none',
          title: '网络错误,换个网络试试',
        })
        reject(err)
      },
    })
  })
}
【拓展】代码规范
为什么需要代码规范
如果没有统一代码风格,团队协作不便于查看代码提交时所做的修改。
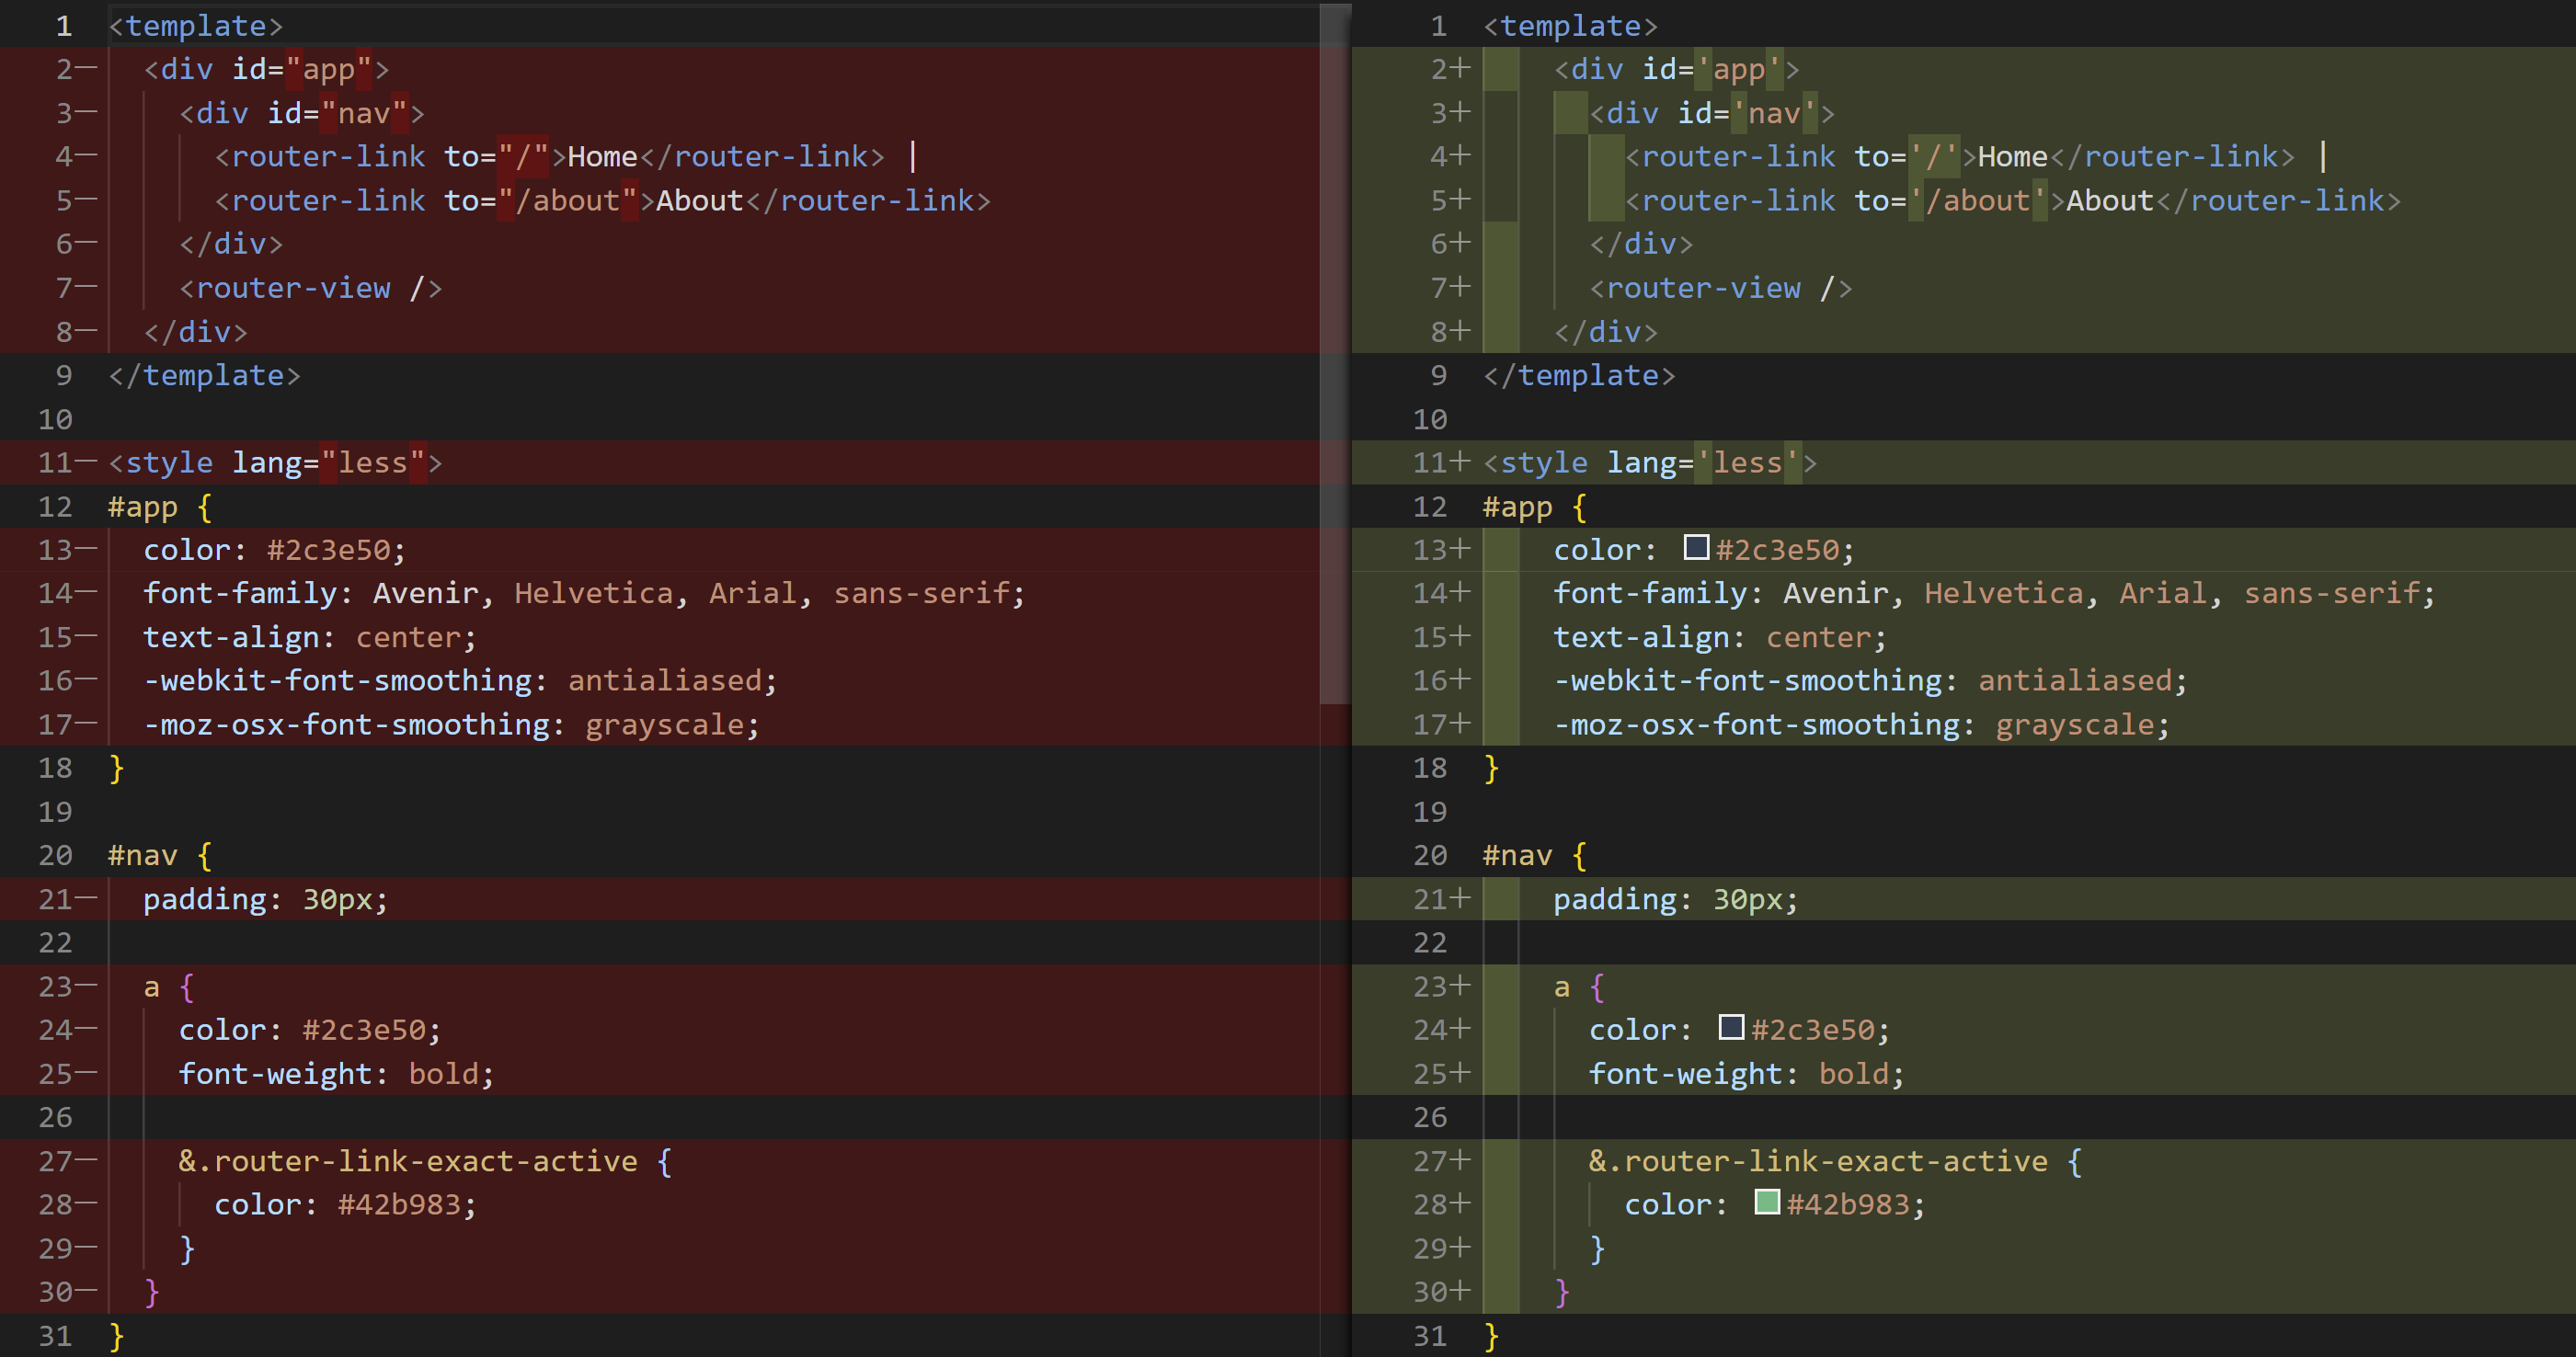
统一代码风格
- 安装
eslint+prettier
npm i -D eslint prettier eslint-plugin-vue @vue/eslint-config-prettier @vue/eslint-config-typescript @rushstack/eslint-patch @vue/tsconfig
- 新建
.eslintrc.cjs文件,添加以下eslint配置
/* eslint-env node */
require('@rushstack/eslint-patch/modern-module-resolution')

module.exports = {
  root: true,
  extends: [
    'plugin:vue/vue3-essential',
    'eslint:recommended',
    '@vue/eslint-config-typescript',
    '@vue/eslint-config-prettier',
  ],
  // 小程序全局变量
  globals: {
    uni: true,
    wx: true,
    WechatMiniprogram: true,
    getCurrentPages: true,
    UniApp: true,
    UniHelper: true,
  },
  parserOptions: {
    ecmaVersion: 'latest',
  },
  rules: {
    'prettier/prettier': [
      'warn',
      {
        singleQuote: true,
        semi: false,
        printWidth: 100,
        trailingComma: 'all',
        endOfLine: 'auto',
      },
    ],
    'vue/multi-word-component-names': ['off'],
    'vue/no-setup-props-destructure': ['off'],
    'vue/no-deprecated-html-element-is': ['off'],
    '@typescript-eslint/no-unused-vars': ['off'],
  },
}
- 配置
package.json
{
  "script": {
    // ... 省略 ...
    "lint": "eslint . --ext .vue,.js,.ts --fix --ignore-path .gitignore"
  }
}
- 运行
pnpm lint
# 或 npm run lint
到此,你已完成 eslint + prettier 的配置。
Git 工作流规范
- 安装并初始化
husky
# 或 npx husky-init && npm install
pnpm dlx husky-init
- 安装
lint-staged
# 或 npm install lint-staged -D
pnpm i lint-staged -D
- 配置
package.json
{
  "script": {
    // ... 省略 ...
  },
  "lint-staged": {
    "*.{vue,ts,js}": ["eslint --fix"]
  }
}
- 修改
.husky/pre-commit文件
pnpm lint-staged
- 之后采用
git commit时候,代码会自动进行格式规范修改